AC Installation in Manhattan Beach: 8 Steps to Success
When Your Oceanfront Investment Needs More Than Box Fans
Sarah stared at the thermostat in her Eastside bungalow—78°F inside, mid-July heat pressing in from Manhattan Beach Boulevard. The vintage charm that sold her on this 1950s home came without central air, and three oscillating fans weren’t cutting it anymore. After getting quotes ranging from $4,200 to $8,500, she realized professional AC installation in Manhattan Beach wasn’t just about dropping in a unit—it required permits, inspections, and a process she needed to understand before signing any contract.
📋 In This Guide
💰 Typical AC Installation Cost Ranges in Manhattan Beach
- Central AC Unit (2–3 tons): $3,300–$5,900
- Ductless Mini-Split (2–3 zones): $3,200–$10,500
- Full HVAC System with Ductwork: $7,000–$16,000
- Permit and Inspection Fees: $150–$400
- HERS Rater Testing (required): $200–$350
If you’re facing a similar decision—whether upgrading from window units or replacing a decades-old system—this guide walks you through every step of the AC installation process in Manhattan Beach. Understanding what happens from initial assessment to final testing helps you ask better questions, spot shortcuts, and ensure your investment delivers efficient cooling for years to come.
Step 1: Schedule a Professional Load Calculation and Site Assessment
Before any equipment arrives, proper sizing ensures that your system can handle your home’s cooling needs without overworking, leading to higher efficiency and longer system life. A licensed HVAC contractor conducts what’s called a Manual J load calculation, factoring in your home’s square footage, insulation levels, window placement, ceiling height, and even coastal sun exposure common in neighborhoods like The Strand.

During this visit, the technician evaluates whether your existing ductwork can support central air or if homes without existing ductwork will require a more involved installation that may require opening walls, ceilings, or floors. They’ll also identify the best location for the outdoor condenser unit—a critical decision in Manhattan Beach where coastal communities face specific challenges, like salt air corrosion that requires solutions to withstand the coastal climate. Expect this assessment to take 60–90 minutes and result in a detailed proposal with equipment specifications and installation scope.
What to Ask During Your Assessment
Request to see the load calculation in writing—not just a guess based on square footage. Ask about SEER2 ratings (efficiency standards updated in 2023), warranty coverage, and whether the contractor handles permit applications themselves. Verify they’re licensed, insured, and familiar with Manhattan Beach Municipal Code requirements for mechanical equipment placement and screening.
Step 2: Obtain Required Permits Before Any Work Begins
In California, and especially in cities like Manhattan Beach and Torrance, most HVAC work legally requires a permit whether you’re replacing an air conditioner, modifying ductwork, or installing a ductless system. Mechanical permits are required to install, alter, repair, replace, or remodel a mechanical system to verify compliance with the current Manhattan Beach Municipal Code and the 2025 California Building Standards Codes.
Your contractor should handle permit applications directly—this typically adds $150–$400 to project costs but is non-negotiable. Replacing an air conditioner typically requires a permit and an inspection, especially if electrical or structural work is involved. The permit process includes submitting equipment specifications, site plans showing equipment placement, and energy compliance documentation.
Manhattan Beach has specific requirements for outdoor equipment: exterior mechanical equipment shall be screened from view on all sides with screening materials that may have evenly distributed openings averaging fifty percent of the surface area. If your condenser is visible from the street, you’ll need to incorporate screening into your installation plan.
Why Skipping Permits Costs More Than Money
If you hire a contractor who begins work without pulling a permit, they can lose their license, and both you and they can be held liable; the city can require you to stop all work and remove the HVAC equipment at your own expense. Beyond legal risks, permitted work triggers mandatory third-party verification that catches installation mistakes before they waste energy and money.
Step 3: Prepare Your Home and Clear Access Routes
Installation day means heavy equipment moving through your home. Installers will cover floors and furniture for protection and also inspect for sealing issues in your home and air duct leaks that can impact the performance of a new system. Clear pathways from entry points to the furnace location (usually garage, attic, or closet) and to the outdoor condenser site.
Move vehicles from driveways to allow crane or truck access if needed. Secure pets in a separate room—installation crews will be in and out, and open doors create escape risks. If your system requires attic work, ensure attic access is clear and any stored items are moved aside. In homes near Manhattan Beach Pier or The Strand where space is tight, coordinate with neighbors about temporary parking needs for the installation vehicle.
Step 4: Remove the Old System and Recover Refrigerant
Your existing air conditioner contains refrigerant that needs to be removed before a new one can be installed; according to EPA standards, it is unlawful to openly vent this refrigerant into the atmosphere, and a device known as a recovery machine must be used. Only EPA-certified technicians can legally perform refrigerant recovery—a process that takes 30–60 minutes depending on system size.
After refrigerant removal, technicians disconnect electrical connections, cut refrigerant lines, and unbolt the old condenser from its pad. The indoor evaporator coil is removed from the plenum above the furnace. Most existing air conditioners being replaced today are between eight to 30 years old, and modern air conditioners are 20–50% larger in height, length, and width because of larger coils which make the unit more efficient; the current location may not accommodate the new one. Expect debris and some minor cleanup during this phase.
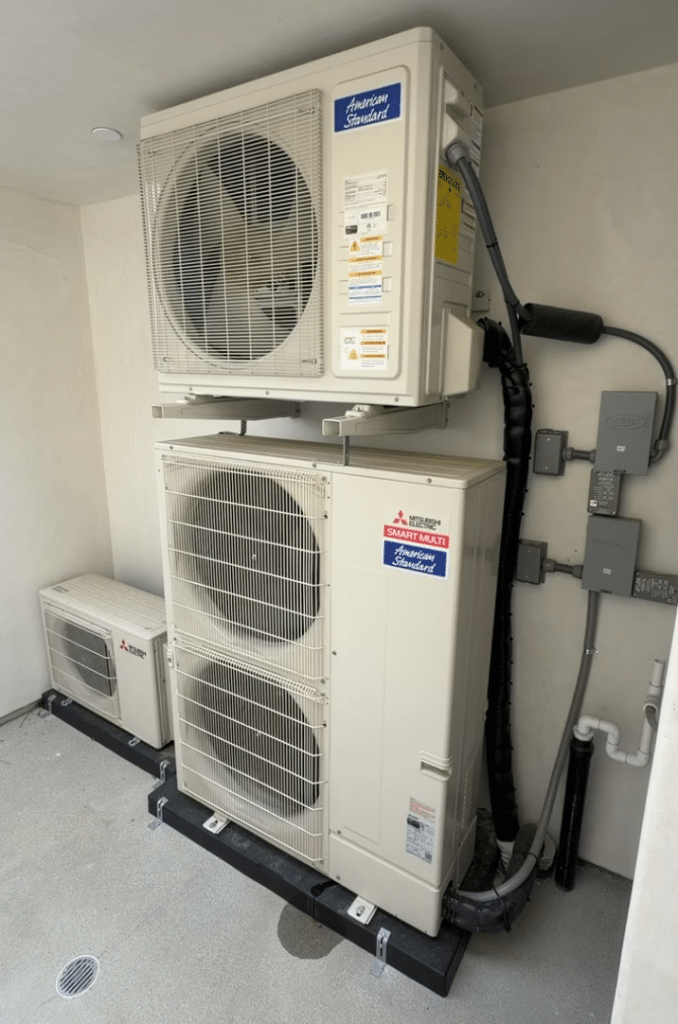
Step 5: Install the Outdoor Condenser and Indoor Evaporator Coil
The pad for the old outdoor unit must be replaced to accommodate the new air conditioner since newer units are larger and wider; the ground may need to be leveled before the technician can set the new pad, and a vibration-absorbing composite pad is preferred over poured concrete that can crack. Proper leveling prevents refrigerant distribution issues and reduces vibration noise—important in quiet residential areas like the Kevyn Avenue neighborhood.
The outdoor condenser is positioned on the new pad with clearance for airflow (typically 12–24 inches on all sides) and service access. Inside, the new evaporator coil is mounted in the supply plenum above your furnace or air handler. This coil must be perfectly sealed to prevent air leaks that waste cooling capacity. Technicians verify the coil is level and secure before proceeding to refrigerant connections.
Coastal Considerations for Manhattan Beach Installations
Salt air accelerates corrosion on outdoor units. Discuss protective coatings or corrosion-resistant materials with your contractor—many manufacturers offer coastal packages with enhanced fin coatings and rustproof fasteners specifically for beachside installations.
Step 6: Connect Refrigerant Lines Using Proper Brazing Techniques
After the line set is fitted to the service valves, they must be brazed in—a form of welding using oxygen and acetylene gases and a filler rod made of alloy metal and silver to join the copper line set and service valves; valves are heated to a minimum of 1200 degrees Fahrenheit. This isn’t optional—proper brazing creates leak-proof connections that preserve system efficiency and refrigerant charge.
Heat protection is applied and dry nitrogen is used to protect the interior of copper tubing from oxidation during welding; dry nitrogen also allows the installer to perform a preliminary leak test, collect moisture, and purge contaminants, then a vacuum process removes oxygen, nitrogen, and moisture. Skipping the nitrogen purge or vacuum process leads to contaminated refrigerant, reduced efficiency, and premature compressor failure. This step typically takes 45–90 minutes and requires specialized gauges and vacuum pumps.
Step 7: Complete Electrical Connections and Install Condensate Drainage
Air conditioners require dedicated electrical circuits—usually 220V for the outdoor unit. Your electrician (often part of the HVAC crew) runs appropriately sized wire from your electrical panel to a weatherproof disconnect box mounted near the condenser. Inside, low-voltage thermostat wiring connects the new system to your control.
The primary condensate line runs from the evaporator coil to a floor drain or condensate pump as a PVC pipe that allows moisture to flow from your home when the AC is running; condensate tubing is secured and glued to protect against flooding, and a safety overflow switch is connected and wired to the furnace control so the system shuts off when tripped. In Manhattan Beach’s coastal humidity, condensate drainage is critical—expect 5–20 gallons of water per day during peak cooling.
Thermostat Upgrade Opportunities
During air conditioner installation, a new thermostat is usually provided. Consider upgrading to a smart thermostat that learns your schedule and adjusts cooling automatically—especially valuable if you’re frequently away from your Manhattan Village home during work hours. Modern thermostats can reduce cooling costs by 15–20% through optimized runtime scheduling.
Step 8: System Testing, HERS Verification, and Final Inspection
When installation steps are complete, it’s time to test the unit to ensure proper operation; your AC tech will run air through the system for around 20 minutes—the air may be warm at first, but it eventually begins to cool as intended while the technician inspects the system’s operation, thermostat readings, and more. Technicians measure temperature drop across the coil (typically 15–20°F), verify proper refrigerant charge using superheat and subcooling readings, and check airflow at registers.
A HERS rater is a third party special inspector that tests and verifies the efficiency and performance of your home’s heating and air conditioning systems, and the HERS rater’s responsibility is to report findings to the state and local building department to sign off on the HVAC improvement permit. This independent testing costs $200–$350 but is mandatory in California. The rater performs duct leakage testing and verifies refrigerant charge—catching issues your installer might miss.
After successful HERS testing, your city building inspector conducts a final inspection to verify code compliance, proper installation, and safety. Once approved, you receive permit sign-off and can begin enjoying reliable cooling. Keep all documentation—permits, HERS reports, and warranty registration—in a safe place for future reference or home sales.
What Happens If Testing Reveals Problems
If any measures do not pass, the client or HERS rater typically contacts the installing HVAC contractor to seal the system until it passes. Reputable contractors fix issues at no additional charge—another reason to choose experienced, licensed professionals rather than the lowest bid.
Why Professional Installation Matters in Manhattan Beach
Sarah’s Eastside home now stays a comfortable 72°F even when beach temperatures hit 85°F. Her HVAC installation in Manhattan Beach passed inspection on the first attempt because her contractor followed every step—from proper load calculations to certified testing. The $5,800 investment included a 16 SEER2 system, complete permits, HERS verification, and a 10-year parts warranty.
Installation quality determines whether your system delivers rated efficiency or wastes 20–30% of its cooling capacity through leaks, improper charge, or undersized ductwork. Studies show that on average, only 10% of HVAC system installations in the country are done correctly, meaning around 90% of installations waste energy to some degree. Choosing a contractor who commits to every step—not just the minimum required—protects your investment and your comfort.
| Installation Approach | Proper Installation | Shortcut Installation |
|---|---|---|
| Permit Process | Contractor pulls permit, schedules inspections | No permit, homeowner liability |
| Load Calculation | Manual J calculation based on home specifics | Guess based on square footage only |
| Refrigerant Connections | Brazed with nitrogen purge, vacuum tested | Flare fittings or brazing without purge |
| Duct Testing | HERS rater verifies leakage under 6% | No testing, potential 30–40% leakage |
| Final Result | Rated efficiency, warranty protection | 20–30% efficiency loss, voided warranty |
When you’re ready to move forward with AC installation, Shalom Heating & Air brings decades of experience to Manhattan Beach homes. Our technicians handle every step—from initial load calculations through final inspection—ensuring your system performs exactly as designed. We pull all required permits, coordinate HERS testing, and guarantee our work meets both manufacturer specifications and California’s strict energy codes. Whether you’re adding central air to a vintage beach cottage or replacing an aging system in Manhattan Village, our team delivers installations that pass inspection the first time and cool efficiently for years. Contact us today to schedule your free assessment and discover why Manhattan Beach homeowners trust us with their comfort investments.
Professional installation protects more than just equipment—it protects your investment, your home’s value, and your family’s comfort through the hottest Southern California summers. Take the time to understand each step, ask detailed questions, and choose contractors who prioritize quality over speed. Your properly installed AC system will reward you with decades of reliable, efficient cooling.